

3Products
Adding and updating what you sell: products, options, pictures, prices, stock, and how they're grouped in your store.
The product list #
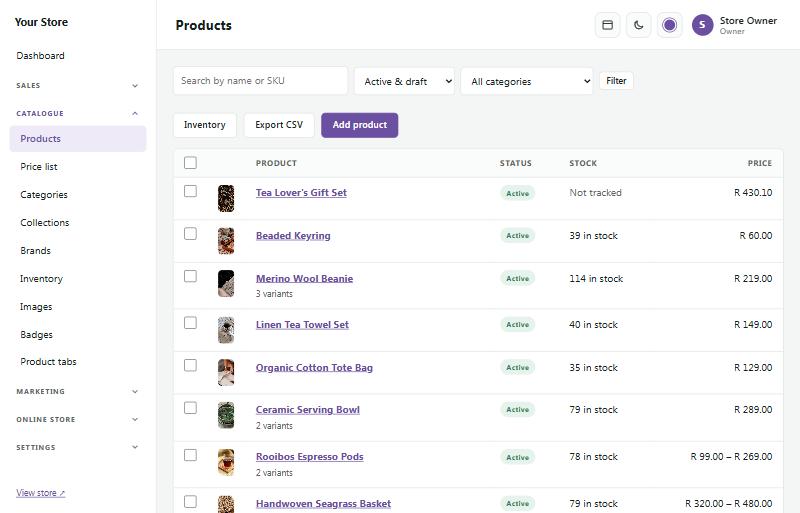
Catalogue → Products lists everything you sell, with its picture, status, stock and price.
- Search by name or SKU, or filter by status (active, draft, archived) and category.
- Click a product's name to edit it.
- Add product starts a new one; Export CSV downloads all products for a spreadsheet.
Sample products #
Sample content shows how a full store looks: 24 example products in three departments, and home page banners, all with plain placeholder pictures. You can choose it when your store is installed, and switch it on or off with the small Sample content switch at the bottom of Catalogue → Products. Once your own products are in and the samples are off, the switch goes away.
- Switch on to add the samples, even if you already have products of your own. Your products stay as they are.
- Switch off to remove the sample products, their departments once they're empty, and the placeholder pictures on your home page (from sample content or a theme layout). Products and pictures you added yourself are never touched. A sample product that is already on an order is archived (hidden) instead, so the order keeps its details.
Sample products from a demo (Install with a demo, or a demo switch in Online store → Demo library) have real photos and are marked Sample in the product list. Remove them with the same switch, or on the Demo library page with Remove unchanged sample products, which keeps any you have edited.
Switch sample content off before you open your store.
Adding a product #
- Go to Catalogue → Products and press Add product.
- Choose Single product (or Bundle, see "Bundles" below).
- Fill in the Name and Description. Use the toolbar for headings, bold text, lists and links. The Web address is made from the name; you can change it later and the old address keeps working.
- Add Images (see below).
- Set the Price, Stock and SKU under Price & stock.
- On the right, choose the Status (Active: for sale; Draft: hidden), the Brand, Categories and Collections.
- Press Save at the top.
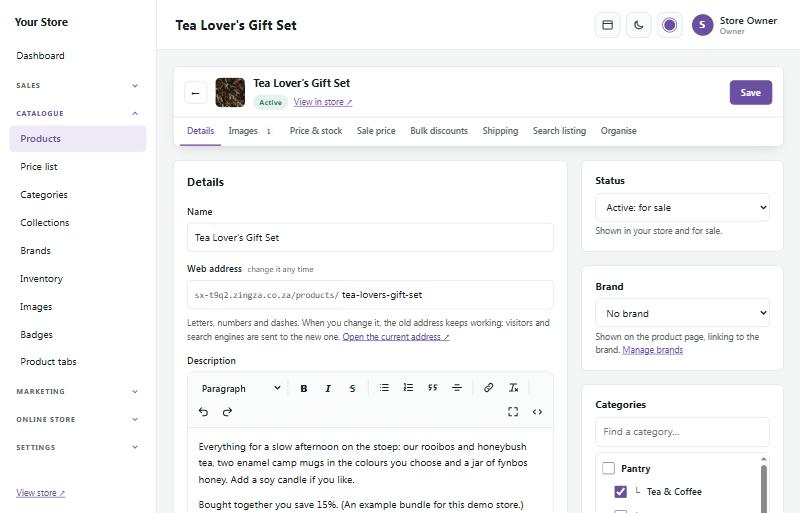
The tabs along the top of the product (Details, Images, Price & stock, Sale price, Bulk discounts, Shipping, Search listing, Organise) jump to each part of the page.
AI writing help
Once your AI key is saved under Online store → AI chat, the product page has AI writing tools. They fill in the form for you to read and change; nothing is saved until you press Save.
- Write description: open AI writing help under the description, add a few facts in Notes for the AI if you like (material, where it's made, how it fits), and press Write description. You get 80 to 150 words with a short list of key points, written from the name, options, categories, brand and your notes.
- Translate: choose Afrikaans, isiZulu, isiXhosa or Sesotho and press Translate. The translation opens in a box to copy, for a product tab, a page or a post; your description isn't changed. Ask a first-language speaker to read it before you use it.
- SEO title & description: under Search engine listing, fills the page title and description at the right length for Google.
- Describe pictures: under Images, the AI looks at the saved pictures and writes a short description of each for screen readers and search engines.
Each use costs a little on your AI account and counts towards the AI chat's daily limit. Each staff member can use the tools 30 times an hour.
Options like size and colour #
If a product comes in different sizes, colours or materials, tick This product has options, like size or colour under Price & stock.
- Type up to three options (for example Size and Colour).
- List each option's values, separated by commas: S, M, L, XL and Natural, Olive.
- Every combination becomes a variant with its own price, sale price ("Was"), cost price, stock and SKU.
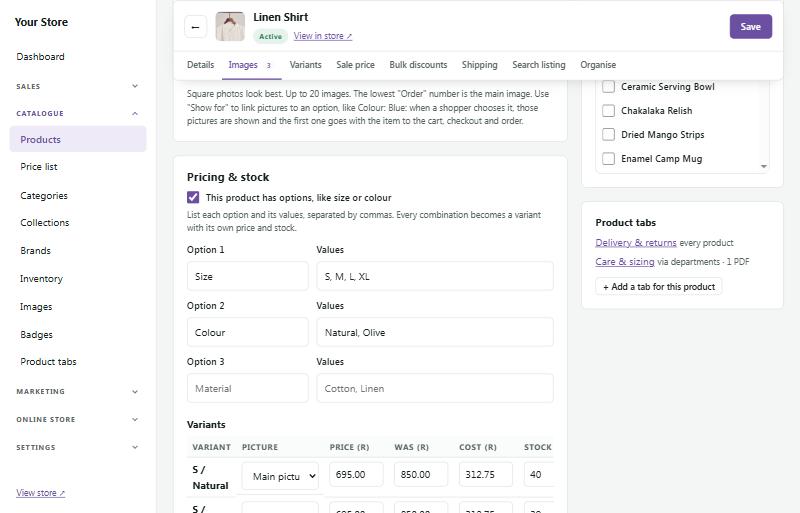
Don't sell one combination? If you don't stock XL / Olive but do sell XL and Olive in other combinations, tick Remove at the end of its row in the Variants table and save. Shoppers see that combination as unavailable. Removed variants are listed under the table: tick Restore and save to sell it again. A product always keeps at least one variant.
Pictures #
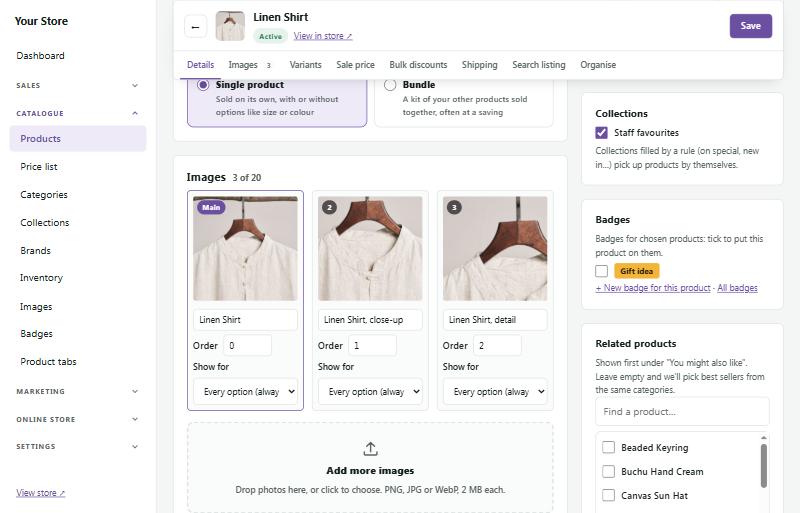
Under Images you can upload up to 20 pictures per product (PNG, JPG or WebP, up to 2 MB each). Drag photos onto the box, or click it to choose.
- The picture with the lowest Order number is the main picture.
- Add a short description to each picture for screen readers and search engines.
- Show for: link a picture to an option value, such as Colour: Olive. When a shopper chooses Olive, those pictures are shown, and that picture goes with the item to the cart and order.
Catalogue → Images sets how all pictures are shown across your store: the shape (square, portrait, tall or landscape), whether pictures fill the shape or are shown whole, and the background behind them. You can also set a focus point on a picture so cropping keeps the important part.
The picture library and bulk actions
The Picture library (lower down on Catalogue → Images) shows every picture on your store: product pictures, and banner and page pictures from the page builder. Use the tabs to see All pictures, Product pictures or Banner & page pictures, type in Search by name to find a picture by its file name or product, and choose Show:
- Everything.
- Not used: pictures nothing on your store uses any more (old banners, pictures uploaded twice, pictures left over after a product changed). Each banner or page picture shows whether it is used: On a page, Used in your store (a logo, a popup, an email…), Made from a picture in use, or Not used. A picture that only an older version of a page uses (page history) shows Not used (only in page history): if you delete it and later restore that older version, that picture is missing.
- Needs attention: product pictures that are small, a different shape or a large file.
Click a product picture to set its focus point and description, or trim or pad it on its own. Click a banner picture to open it in a new tab.
Select many at once (bulk): tick the box on each picture, or Select all on this page. The bar at the bottom shows how many are selected and stays in view while you scroll. Then choose:
- Trim plain borders: crops the plain margin around ticked product pictures.
- Fit to shape (no cropping): pads ticked product pictures out to your store's picture shape.
- Remove backgrounds: sends ticked product pictures to Photoroom (only when Photoroom is set up, see Background removal below). Choose a see-through or white background and whether to use the cut-outs on the products straight away. Pictures that already have a cut-out are skipped.
- Delete unused: deletes the ticked pictures that nothing uses, with their smaller copies. Pictures in use are always skipped and listed, so you can't break a page or product by accident. Deleting can't be undone. Deleting banner and page pictures needs the page builder permission. Deletions show in the activity log.
Many pictures are done a few at a time, with the progress in the bar, so a long job never stops halfway. You can keep working in another tab.
No more duplicate pictures: when you upload or import a picture that is already on your store (the very same picture), SaleCart uses the one it has instead of saving another copy. Duplicates saved before version 1.16.0 stay until you delete them: show Not used to find them (copies of the same picture sit together, as their names start the same).
Box around each product (on the same page) sets how product cards look in grids and sliders, on the home page too: As it is, Clean outline, Soft card, Lift and glow, Framed picture or Brand accent. Each choice shows a small sample, and As it is keeps cards without a box.
Product list paging (pagination; on the same page) sets how shoppers see more products in departments, All products, search results, brands and collections: Page numbers (numbered pages with previous and next buttons; phones show Page 6 of 20), Load more button (the next batch is added under the products, with You've seen 24 of 312) or Lazy load (infinite scroll) (more products load by themselves as the shopper scrolls, with a Load more button every 5 pages so the footer stays reachable). Products per page (4 to 96, normally 24) is also the size of each batch. The shopper's sort and search words are kept, the address follows along so Back and refresh return to the same place, and search engines always get plain page links. Tick Show a "See all" button to add a button beside the page numbers or the Load more button (under You've seen 24 of 312 with lazy load) that shows the whole list on one page, keeping the sort and search words; that page says Showing all 86 products with a Show fewer link back. It is off at first, its wording can be changed under "See all" button wording, lists of more than 240 products keep their pages, and search engines are asked not to list the see-all page.
Product filters (on the same page) let shoppers narrow departments, All products, search results, brands and collections by Price (from and to, in the currency they shop in, at the price they would pay), Category (departments, or the sub-categories on a category page), Brand, the options on your products (such as Colour and Size; colours named in plain words get a small colour dot), In stock only (products on pre-order count, "coming soon" ones don't), On sale only and 4 stars & up. Each filter only shows when it has something to filter, and every choice shows how many products it has. Ticking two choices in one filter shows products with either; choices in different filters must all match. The products update straight away, the shopper's sort and search words are kept, 24 products and a chip for each filter in use (with Clear all) sit above the products, and Back steps through the choices. On phones a Filter button beside Sort opens the filters full screen, with Show 24 products and Clear. Choose Sidebar (a column on the left), Top bar (a row of buttons above the products) or Off; untick filters you don't want and use the arrows to change their order; under Options that become filters untick option names that shouldn't be filters (up to 6 show at once, the most used first). Filters are on as a sidebar at first. Filtered pages are kept out of search engines, which list the plain list instead.
Picture compression (at the top of Catalogue → Images, for staff who may change store setup) makes picture files smaller with TinyPNG, so your store loads faster, especially on phones. Get a key at tinypng.com/developers, paste it under TinyPNG API key and press Test key, then tick Compress new pictures automatically and Save. Every picture saved from then on is compressed a moment after it is saved, with the same name and look; uploads never wait for it. Compress existing pictures shows how many pictures aren't compressed yet and roughly how much could be saved, and does them 20 at a time; press Stop to pause. The first 500 pictures each month are free and TinyPNG charges your account after that, so Stop at the free 500 a month is ticked to start with.
Smaller copies for cards and phones (on Catalogue → Images) gives every product picture a card-sized copy, and every banner and page photo a phone-sized one, beside the picture itself. Product cards, small lists, the cart and phones then load the smaller picture (often a third of the size or less), while big screens and the product page still get the full picture; your pictures themselves never change. New pictures get their copies when they are saved, and older ones a few at a time by themselves; press Make them now to do them all straight away. Deleting or replacing a picture removes its copies too.
Background removal cuts your product out of its photo with Photoroom, so it stands on a clean see-through or white background. Each store uses its own Photoroom account: sign up at app.photoroom.com/api-dashboard, copy your API key, paste it under Catalogue → Images → Background removal (staff who may change store setup) and press Test my key, then Save. It starts in Free (sandbox) mode: up to 100 pictures a day and 1,000 a month at no cost, but each cut-out carries a Photoroom watermark, so it's for trying it out. For your real product photos choose Paid (no watermark): Photoroom then bills each picture to your own Photoroom account, and you can set a monthly limit.
On a product, press Remove background under a picture, choose a see-through or white background and press Make cut-out. You see the picture before and after: Use the cut-out shows it on the product (the original is kept, and Put the original back swaps it back any time), Undo throws it away and Decide later keeps it for later. The button only shows once Photoroom is set up (SaleCart's own white-background removal was removed in version 1.16.0, as its edges were rough); cut-outs made before can still be used or put back. For many products at once, use Catalogue → Images → Remove backgrounds, tick products under Catalogue → Products and choose Remove backgrounds (Photoroom) (pick the main picture or every picture, press Start, and Stop whenever you like), or tick pictures in the picture library above. Banners and hero slides that cut the product out use a Photoroom cut-out of the picture when there is one (paid mode, never a watermarked one), or the picture itself when it is a see-through PNG; any other picture is shown as it is, on a white card. Photoroom's own terms apply.
Prices, specials and cost prices #
- Price: what the customer pays, including VAT if you're VAT registered.
- Sale price: set a "Was" price higher than the price and the store shows the old price crossed out with a Sale badge. You can also give the sale a start and end date. To put many products on special at once, use Marketing → Sales & specials.
- Cost price: what the item costs you. It's never shown to customers; it powers the Profit widget on your dashboard and the margins in reports and your price list.
- Bulk discounts: "buy more, save more", for example 5% off when buying 2 or more.
- Price on request: tick it (under Status, on the right) for items you quote individually. The store shows "Call for price" instead of a price, with Ask for a price (an email to you) and your phone number; the item can't be added to the cart and is left off your price list.
Weights, sizes and unit prices #
Everything is metric. A product has two different measurements:
- Weight is the packed weight couriers use for quotes. Type it in grams or kilograms: choose Type weights in under Units (on the right of the product page). It's always kept in grams, so 1.25 kg is saved as 1250 g and nothing else changes. Switching between g and kg converts the weights already typed.
- Size or contents is what shoppers see, like 500 g, 2 kg, 750 ml or 5 L. Each variant can have its own (in the Size column of the variants table). It shows on product cards, on the product page beside the price, in the cart and on the compare page, and goes to Google Shopping as a unit price.
Usual size unit (under Units) is the unit picked first when you type a size. Each size can still use another unit.
Defaults: set the store's units under Online store → Store features, in the Show price per unit box. A category can have its own (Units for its products, on the category's page); its sub-categories use it too. A product uses its own choice first, then its category's, then the store's. A product in several categories takes the first one, in the order of your category list, that has a unit set.
Many products at once: on the product list, tick the products and choose Set weight & size units…. Sizes already typed move with a new unit of the same kind (500 g becomes 0.5 kg); a size in ml or litres stays as it is when you choose g or kg.
Price per unit: switch on Show price per unit under Online store → Store features to show, for example, "R12.50 / 100 ml" under the price. Sizes under 1 kg or 1 litre show the price per 100 g or 100 ml; bigger ones per kg or per litre. While an item is on sale, the sale price is used.
Stock and inventory #
Each variant has a Stock number. When an order is paid, stock goes down by itself; when an order is cancelled, it goes back up.
Catalogue → Inventory shows every SKU in one list, so you can update stock quickly:
- Use the – and + buttons or type a number, then press Save stock.
- Alert at: you're warned on the dashboard when stock falls to this level.
- Track: untick for items you never run out of (like made-to-order goods).
- Sell when out: let customers order even when stock is 0 (backorders).
- The tabs show low stock, out of stock and untracked items. History shows every change to a SKU.
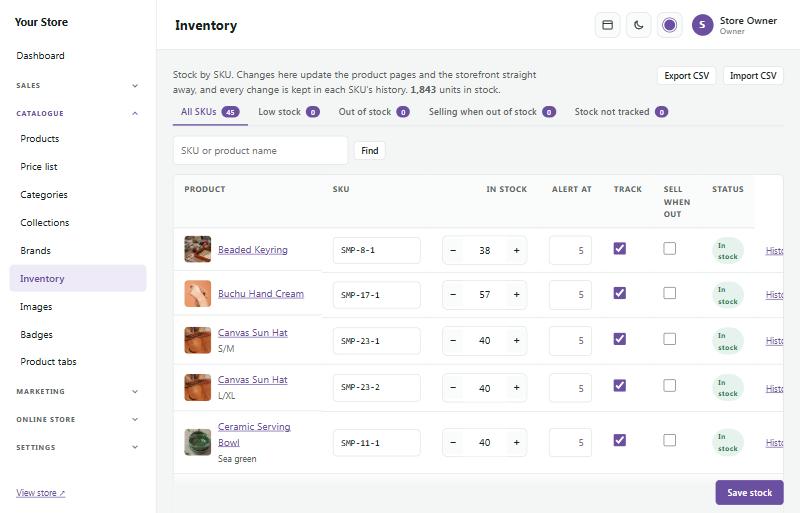
Export CSV and Import CSV let you update stock for many items in a spreadsheet. The export shows every SKU's stock number, also for items whose stock isn't tracked (the Track stock column says yes or no). On import, Track stock switches tracking on or off for that SKU; without that column, a SKU given a stock number is tracked from then on. A row with an empty Stock keeps its number.
Categories and departments #
Catalogue → Categories organises your products the way shoppers browse:
- Main categories are departments; they appear under All departments in your store's header.
- Each department can have sub-categories, which slide out beside it.
- Sub-categories can have their own sub-categories, up to 6 levels deep (for example Servers › Server parts › Hard drives › Dell). The menu shows the first two levels; deeper ones appear as links on each category's page, with the full path above the heading.
- Use the arrows to change the order, Hide to take a category off the store, and Edit to change its name, picture and description.
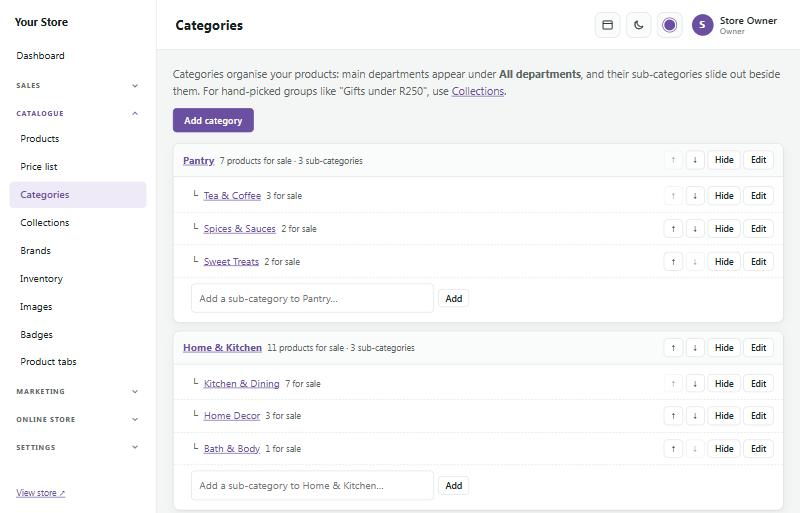
Put a product in a category on the product's page (right-hand side, under Categories). A product in a sub-category also shows on the pages of every category above it.
Collections #
Catalogue → Collections are groups of products you put together, separate from your categories, such as "Gifts under R250" or "Staff favourites". A collection can be:
- Hand-picked: you choose the products.
- On special: everything with a sale price, automatically.
- New in: products added in the last few days.
- Under a price: everything below an amount you choose.
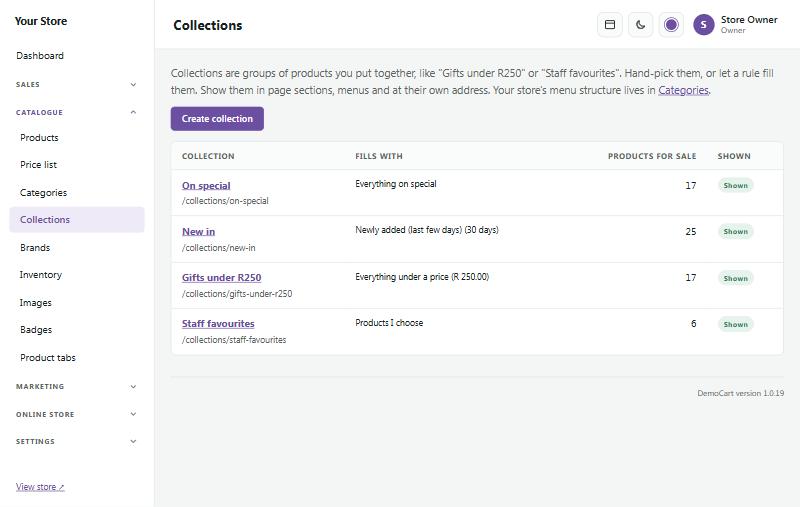
Each collection has its own page in your store and can be shown in page sections and menus.
Brands #
Catalogue → Brands lists the brands you sell. Each brand gets its own page listing its products, and its logo can appear in a brand logo slider on any page. Choose a product's brand on the product page.
Bundles #
A bundle is a kit of your own products sold together, often at a saving (for example a tea, two mugs and a candle).
- Add a product and choose Bundle.
- Add the items that go in it, and choose the discount.
- Items with options (like mug colours) let the shopper choose; you can also add optional extras.
A bundle's stock comes from its items, so it can never be sold if an item has run out.
Personalisation #
Let shoppers add engraving, a gift message, a font or style, or their own logo or photo, at an extra charge. Great for jewellery and gifts.
- Open the product and, in the Personalisation panel, choose Set up personalisation.
- Add fields with the buttons Engraving, Gift message, Font choice or Logo or photo upload, and change them as you like: the name shoppers see, help text, Required, Most characters, Allowed characters (for example letters and numbers only), an Extra price and, for text, Plus per letter. A file upload has its own file types and largest size.
- Under Orders, tick Personalised items can't be returned and set Extra days to make it if you need time to make the item.
- Press Save personalisation. To use the same fields on other products, tick them under Use these fields on other products, or use Copy from another product.
On the product page the fields show under the option choice, with a character counter, a live preview of the engraving in the chosen font, and the price with the extras. Every personalised item is its own line in the cart, so two different engravings never merge. The details show on the order, the invoice, the packing slip and the emails.
Digital downloads and licence keys #
Sell e-books, software, courses, music or templates. There is nothing to deliver: buyers get secure download links and their licence keys by email, on their order page and under My downloads in their account, as soon as the order is paid.
- Open the product and, in the Digital download panel, choose Set up digital download.
- Tick Sell this product as a digital download. If only some options are digital (the e-book but not the paperback), choose Only these and tick them.
- Set Downloads of each file (for example 5; 0 = no limit) and Links work for (days) (for example 30; 0 = never expire), then press Save.
- Under Files, upload each file and give it the name buyers see. Files that are too big to upload go in the server folder app/storage/digital-inbox (by FTP or your host's File Manager); then choose them under Add from the server folder.
- To sell licence keys, tick Give buyers a licence key from my list, choose One key for each item bought or One key per order line, and set when to warn you. Then add keys under Licence keys: paste them (one per line), choose a CSV or text file, or use Make keys with a pattern like XXXX-XXXX-XXXX.
A cart with only downloads skips the delivery step and needs no address. A cart with downloads and parcels works as usual, and only the parcels count for delivery. An order with only downloads is marked Completed as soon as it is paid.
On the order page in admin, the Downloads and licence keys panel shows how often each file was downloaded, with the time and address of every download. Use Reset download count, Extend, New link (when a link was shared), Switch off and Email the links again. A key that doesn't work can be taken back with a new key in its place.
Event tickets #
Sell tickets to a show, market, workshop or festival through your normal checkout. Buyers choose how many of each ticket type they want, pay, and get their tickets by email and on their order page as soon as the order is paid. Every ticket has a QR code that you scan at the door.
- Make a product for the event (its name, description and pictures are the event's page), then open the Event tickets panel and choose Set up event tickets.
- Tick Sell tickets for this event and fill in when it Starts (and, if you like, when it Ends and when the Doors open).
- Under Where, type the Venue and Address. Buyers get a Map and directions link: a Google Maps search for the venue and address, or paste your own Map link to the exact gate or parking. For an online event, paste the Online link: it shows only on paid tickets.
- Under Places and sales, set the Capacity (people, across every ticket type), and when tickets go on sale and when online sales close (empty: on sale now, until the event starts). Press Save event.
- Under Ticket types, add each type with its price: for example Adult R150, Child (3–12) R80, Pensioner R100. Use Quick add for Adult, Child, Pensioner, Student, Family of 4, Group of 10 and Early bird. Press Save ticket types.
For each ticket type you can set:
- Admits: how many people one ticket lets in. A family ticket that admits 4 has one QR code for the whole family, and takes 4 places.
- Available: how many of this type you sell (for example 50 VIP tickets). Empty: no limit of its own, only the event's capacity.
- Fewest per order and Most per order: for example at least 2 for a couples' ticket, or at most 10.
- On sale from and On sale until: an early-bird type stops by itself on its date, next to the normal type at the full price.
- Note: shown under its name, like "Ages 3 to 12" or "Includes a drink".
- Staff only: not shown or sold on the event's page. Use it for Complimentary tickets (free, for guests, press or crew): give them out with an order made in the admin (Sales → Orders → + New order) or at the till, and they get a QR code and are checked in like any other ticket. Quick add → Complimentary adds one at 0.00, already staff only; Quick add → VIP adds a VIP type to sell at your price.
A cart with only tickets skips the delivery step and needs no address. Unpaid orders hold their places until they expire, and the capacity is checked again when the order is placed, so the last place can never be sold twice. Discount codes, gift vouchers and specials work on tickets as on any product. Buyers can put a name on each ticket (for gifts and groups) until the event starts, and print their tickets or show them on their phone.
Tickets are paid at checkout like any order, with the payment gateways you have switched on (card, Instant EFT, PayPal, buy now pay later and the rest), or by bank EFT: the tickets are issued as soon as the payment is confirmed (an EFT order when you mark it paid). The event's page lists the ways to pay. Lay-by isn't offered for tickets.
Several days, or several events under one pass
Open Days and sessions on the event's set-up page (after saving the event) and add each day or session with its start, and optionally a title, its own venue and map link, doors and capacity.
- A course over several days (for example a 3-day course): add Day 1, Day 2 and Day 3. Leave the ticket types valid for every day: one ticket gets the person in on each day, and is checked in once a day.
- A festival or weekend pass (several events or places): add each event with its own title, venue and map link. Under Ticket types, use Full pass for a ticket valid for everything, and A day ticket for each day for tickets valid for one day. Tick Valid for on any type for other mixes, like a Saturday and Sunday pass.
The capacity counts on each day or session: a pass takes a place on every day it covers. A day can have its own capacity (a smaller venue); empty uses the event's. Without a closing time, online sales of a pass stop when its first day starts, and a day ticket's when its own day starts. The event's page shows the programme with each place and map link, the tickets show the days they are valid for, and Add to calendar adds every day.
At the door, choose the Day or session next to the event (today's is chosen for you). A ticket for another day shows in red with the days it is valid for. The door list and its CSV show who came on each day.
At the door
Open Sales → Ticket check-in on a phone or tablet and choose the event.
- Scan with the camera reads QR codes in browsers that can (Chrome on Android, for example). On an iPhone, scan the ticket with the phone's own Camera app: the QR code opens the ticket's check-in page while you are signed in.
- A USB or Bluetooth barcode scanner types the code into the Ticket code box for you, or type the code yourself.
- No QR code? Find the person on the door list by name, email or order number.
A green answer means the ticket is valid: press Admit. A group ticket can come in all at once or a few at a time. A ticket that was already used, voided, refunded or is for another event shows in amber or red, with when it was first used. Undo last check-in fixes a wrong scan. Tick Let single tickets in straight away for a fast lane.
Give door staff a role with only Check in event tickets at the door (Settings → Staff & roles → Roles): they can scan and search the door list, and nothing else. Sales → Tickets shows every event with tickets sold, places left and people in, the Door list and a CSV to print.
Badges #
Badges are the small labels on product pictures, like Sale, New or Sold out. Manage them under Catalogue → Badges.
- Built-in badges: Sale, New (for products added in the last few days) and Sold out. Rename them, change their colours or switch them off. Most badges on one product limits how many show together.
- Your badges: add your own, like "Local favourite" or "Gift idea", with a colour and an optional start and end date.
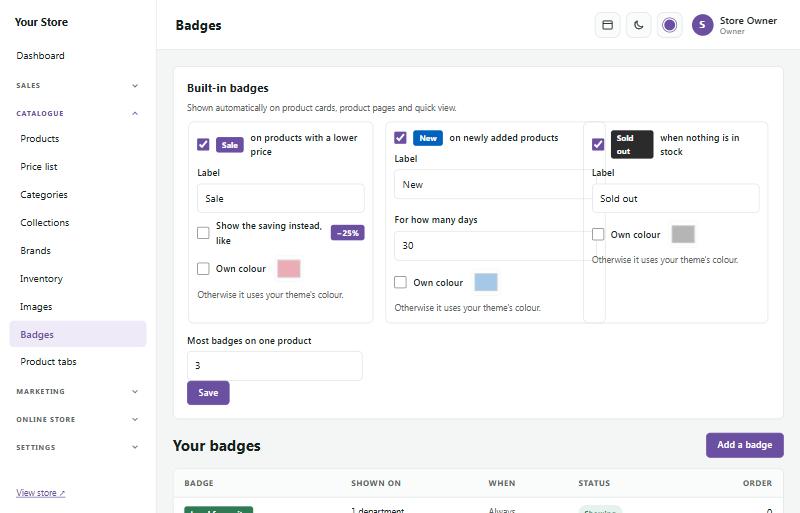
Choose where each badge shows:
- Every product in your store.
- Departments (and their sub-categories) or categories you choose.
- Collections you choose.
- Bundles: every bundle, or only the ones you tick.
- Chosen products, or newly added products.
You can also put a product on a badge from the product's own page: the Badges box on the right lists your "chosen products" badges with a tick box each, and shows which other badges reach that product.
Product tabs #
Catalogue → Product tabs adds extra tabs beside the description on product pages, such as Delivery & returns, a size guide or care instructions. A tab can include PDF downloads and can show on every product, on a department, on chosen collections or on chosen products.
Your price list #
Catalogue → Price list turns your products into a neat price list, ready to send to customers.
- Choose what to include: all products or one category; grouped by category or A to Z; a line for every option or one "from" price; prices with or without VAT; pictures, SKUs, stock, specials and descriptions.
- The preview on the right shows the result.
- Press Download PDF for a printable price list with your logo, or Download Excel for a spreadsheet.
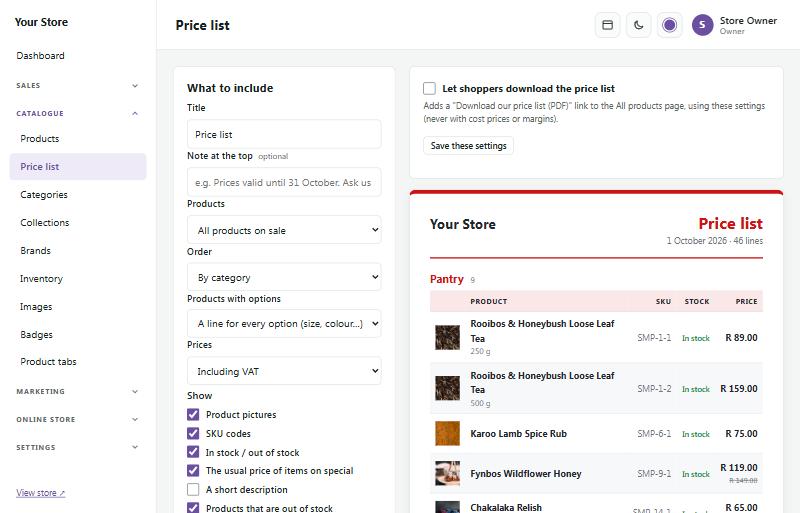
Tick Cost price and margin for a version for your own use only. To let shoppers download the price list from your store, tick Let shoppers download the price list and press Save these settings: a link appears on the All products page (shoppers never see cost prices).
Importing from another store #
Moving from another platform? Catalogue → Import products (or Import on the product list) brings your products across: names, descriptions, options and variants, SKUs, prices and "Was" prices, stock, weights, categories, brands and photos.
- Choose where your products are now.
- Upload the export file, or enter the old store's database details (see below).
- Check the preview: how many products, variants, photos and new categories were found, the first 20 products, and notes about anything that was skipped or changed.
- Press Start import. Products are added a few at a time while a bar shows the progress. Keep the page open; if it closes, open Import products again and press Continue import.
Shopify: in Shopify go to Products, press Export, choose All products and CSV for Excel or Plain CSV file. Shopify emails you the file. Each product's Product type becomes a category.
WooCommerce: in WordPress go to Products → All Products and press Export at the top. Keep all columns and product types, and press Generate CSV. Variable products arrive with their variations, and categories keep their departments and sub-categories.
OpenCart and Zen Cart: these can't export products without add-ons, so the importer reads them straight from the old store's database. You need the database server, name, user and password, and the table prefix. Find them in the old host's cPanel under MySQL Databases, or ask the old host. Also enter the old store's web address: the photos are copied from there. The details are used once and never saved. Options with choices (like size or colour) become variants, with their extra prices added.
SaleCart CSV: the file from Export CSV on the product list. You can also add products from a spreadsheet in the same layout, with an extra Images column for picture addresses.
Good to know:
- Import as drafts is on at first, so nothing shows in your store until you've checked the products and set them to Active.
- A product whose SKU or web address is already in your store is skipped, so importing the same file twice never makes duplicates.
- Download photos from the old store copies each picture and resizes it to at most 1600 pixels wide. The old store must still be online. If a photo can't be copied, the product is still added.
- Up to 3 options, 100 variants and 20 photos per product come across, like the product editor allows.
- Customers, orders, reviews, pages and blog posts are not imported.
Questions and answers #
Catalogue → Questions
Shoppers can ask about a product on its page, under Questions & answers. They don't need an account: they type the question and their name, and can leave their email to hear when it's answered.
- Switch it on at the top of the Questions page: tick Shoppers can ask questions on product pages and save.
- New questions wait under Waiting. With the phone app, you can get a notification for each one (tick Product questions in its alerts).
- Type your answer and press Answer. The question and answer then show on the product page. If the shopper left their email, Email the answer sends it to them, and their email address is then deleted. You can change the wording under Online store → Emails → Question answered.
- Change an answer at any time. Hide takes a question off the store; Delete removes it for good.
Questions only show once they're answered, the most helpful first (shoppers can press Helpful). After five, the rest are behind Show more.